Nov 22

With iOS 5 there’s a subtle change in behavior related to custom table view headers. Actually it’s just a more strict enforcement of the existing API. But the end result is the same: Your app may not work as you expected when running on iOS 5.

If you are implementing

- (UIView *)tableView:(UITableView *)tableView viewForHeaderInSection:(NSInteger)section 

in your UITableViewDataSource then you must also implement

- (CGFloat)tableView:(UITableView *)tableView heightForHeaderInSection:(NSInteger)section

The heightForHeaderInSection method needs to return a height of 0.0 when the viewForHeaderInSection returns a nil for the case when there are no rows in that section. Otherwise you will see a lot of gray, empty header views in your table in iOS 5.

To Apple’s credit they have clearly stated this in the documentation for tableView:viewForHeaderInSection:

This method only works correctly when tableView:heightForHeaderInSection: is also implemented.

But if you missed this in the documentation and you’re wondering why your tables views suddenly don’t look so good in iOS 5, there’s your explanation. And the quick fix.

written by Nick \\ tags: , , ,

Sep 16

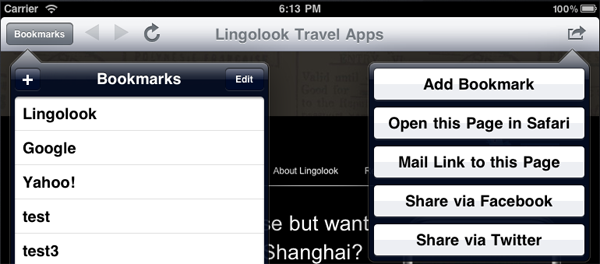
The iPad UI Element Guidelines section of the iPad’s Human Interface Guideline forbids displaying more than one popover element at a time. Like this:

DontDisplayTwoPopoversOnTheiPad.png

Since there’s no explicit support in UIKit for avoiding this, I thought I’d show one way to remain in compliance with the HIG.

In the app depicted above, the left popover is the standard list component (left side) of a split view controller. It is shown in portrait mode when you tap the Bookmarks button. The popover on the right is an alert sheet that appears when you tap the action button.

The left popover is retained in the property self.popoverController, per Apple’s split view controller template. For the right popover I store the action sheet in the actionButtonActionSheet attribute.

When the action button is tapped this code is called:

- (IBAction)actionButtonSelected:(id)sender {
  // Dismiss other popovers, if visible
  if ([self.popoverController isPopoverVisible]) {
    [self.popoverController dismissPopoverAnimated:YES];
  }
	
  actionButtonActionSheet = [[UIActionSheet alloc] initWithTitle:nil 
                                                        delegate:self 
                                               cancelButtonTitle:nil 
                                          destructiveButtonTitle:nil 
                                               otherButtonTitles:NSLocalizedString(@"button.add.bookmark", @""),
                                                                 NSLocalizedString(@"button.open.safari", @""),
                                                                 NSLocalizedString(@"button.mail.bookmark", @""),
                                                                 NSLocalizedString(@"button.share.facebook", @""),
                                                                 NSLocalizedString(@"button.share.twitter", @""), nil];
  [actionButtonActionSheet showFromBarButtonItem:sender animated:YES];
  [actionButtonActionSheet release];
}

The important part for this discussion is the first couple of lines that dismiss the other popover if it’s visible.

For the opposite case when the Bookmarks button is tapped, you need to override the willPresentViewController method:

- (void)splitViewController:(UISplitViewController *)svc popoverController:(UIPopoverController *)pc willPresentViewController:(UIViewController *)aViewController {
  // Dismiss other popovers, if visible
  if (actionButtonActionSheet.visible) {
    [actionButtonActionSheet dismissWithClickedButtonIndex:-1 animated:YES];
  }
}

If your app has more than two buttons that launch popovers, then you should extract the code that dismisses other popovers into one method that you can call from all button action methods.

written by Nick \\ tags: , , ,

Feb 19

In a previous post I presented a framework for creating a data entry screen. That code focused mainly on UITextFields and allowed the user to move to the next field by tapping the Return key on the keyboard.

What if you have one or more UITextViews on your data entry screen because you want the user to be able to enter multiple lines of text? Well the UITextView handles the Return key internally and adds a new line to the text being entered, just like you would expect when you’re writing text in a text editor. And there is no equivalent of textFieldShouldReturn for UITextView.

If you don’t care about newlines in the entered text and you just want to exit the field when the Return key is tapped, then add the following method to the UITextViewDelegate:

- (BOOL)textView:(UITextView *)textView shouldChangeTextInRange:(NSRange)range replacementText:(NSString *)text {
  BOOL shouldChangeText = YES;
	
  if ([text isEqualToString:@"\n"]) {
    // Find the next entry field  
    BOOL isLastField = YES;
    for (UIView *view in [self entryFields]) {  
      if (view.tag == (textView.tag + 1)) {  
        [view becomeFirstResponder];  
        isLastField = NO;
        break;  
      }  
    }  
    if (isLastField) {
      [textView resignFirstResponder];
    }
	
    shouldChangeText = NO;
  }
	
  return shouldChangeText;
} 

The shouldChangeTextInRange method is called after each keystroke is received by the UITextView, but before it’s shown on screen. If the text is a “\n” character (the Return key) then we either set first responder to the next field, or hide the keyboard in the case that this is the last field. (The entryFields method is explained in the previous post.) Return NO if a return character was detected since we don’t want the new line to show up in the UITextView, otherwise return YES and the text will be processed and shown in the UITextView as normal.

written by Nick \\ tags: ,

Nov 09

UIWebView has very few instance methods. One of them is stringByEvaluatingJavaScriptFromString, which very powerful and unfortunately poorly documented. (This is literally the extent of Apple’s explanation: “Returns the result of running a script.”)

Let’s explore this mysterious method with a couple of examples.

A trivial example of how to use stringByEvaluatingJavaScriptFromString is to get the title of the HTML document:

NSString *title = [webView stringByEvaluatingJavaScriptFromString:@"document.title"];

You would typically place this line of code in webViewDidFinishLoad.

This technique is not limited to one-liners, or accessing simple properties. Here’s an example of two lines of JavaScript code executed in order, as you would expect:

[webView stringByEvaluatingJavaScriptFromString:@"var field = document.getElementById('field_2');"
						 "field.value='Multiple statements - OK';"];

You can also call JavaScript functions this way. And if you want to call a JavaScript function that does not already exist in the web page that you’re downloading, you can “inject” it yourself with this technique:

[webView stringByEvaluatingJavaScriptFromString:@"var script = document.createElement('script');"
						 "script.type = 'text/javascript';"
						 "script.text = \"function myFunction() { "
							"var field = document.getElementById('field_3');"
							"field.value='Calling function - OK';"
						 "}\";"
						 "document.getElementsByTagName('head')[0].appendChild(script);"];

[webView stringByEvaluatingJavaScriptFromString:@"myFunction();"];

In essence I’m using Objective C to create a string which represents JavaScript which which when executed adds a JavaScript function to the HTML DOM. Apologies for the multiple meta levels… Let me try to untangle this line by line.

Line 1 : First we create a <script> element using JavaScript.
Line 2 : Set the type of the <script> element to text/javascript.
Line 3-6 : Set the content of the <script> element to the JavaScript function that you want to inject.
Line 7 : Add the new <script> element as a child to the <head> element of the HTML DOM.
Line 9 : Call the new JavaScript function.

Bonus tip: You can break up NSString constants over multiple lines in Xcode for increased readability. Just end the line with a double-quote character and begin the next line with a double-quote character. At compile time these lines will be joined into one string. So the string that begins with “var script” on Line 1 is one continuous string ending with “appendChild(script);” on Line 7.

Although it’s not critical for the discussion above, here’s the HTML that the example JavaScript refers to:

<html>
  <head>
    <meta name="viewport" content="width=320; initial-scale=1.0; maximum-scale=1.0"/>
  </head>
  <body>		
    <p>This is the UIWebView</p>
    <form>
      <input id="field_1" type="text" name="value" /><br/>
      <input id="field_2" type="text" name="value" /><br/>
      <input id="field_3" type="text" name="value" /><br/>
    </form>
  </body>
</html>	

You can use this generic technique to add JavaScript to any web page that you’re downloading and displaying in a UIWebView. The technique and the possibilities are similar to what you can do with the Greasemonkey plugin for Firefox.

written by Nick \\ tags: , ,

Oct 30

For a recent project I encountered the following requirements:

  1. Download and store HTML documents that are rendered using the UIWebView class.
  2. Download and store the external documents referenced in the HTML, like images, so that they, along with the HTML documents, are available in non-networked situations.
  3. Use the same HTML documents and external documents as the body of in-app generated Emails.

The challenge was to devise a scheme whereby the same HTML documents can be used for both rendering content within the app under non-networked situations and to provide the exact same user experience within the Email body; a clear Catch-22!

There are a number of possible approaches (see page 10 of Nick’s presentation, but the one we choose was to use complete URL’s for all externally referenced documents within the HTML (for example, all images are referenced on a CDN). We choose this route as it provides the simplest way to support the Email requirement.

Next we had to figure out a way to modify these URL’s dynamically to reference the same external documents located locally on the device. To do this we use some features of UIWebView and Javascript.

First we set up the UIWebView and implement the webViewDidFinishLoad delegate method to kick off the Javascript. Below you can see we take advantage of the webview’s stringByEvaluatingJavaScriptFromString() method to call our Javascript event listener useLocalPaths().

- (void)webViewDidFinishLoad:(UIWebView *)webView {
  DLog(@"Local URLs used = %@",[webView stringByEvaluatingJavaScriptFromString: @"window.useLocalPaths()"]);
}

The Javascript for the event listener is the following:

<script type="text/javascript">
  window.addEventListener('load',function() {
    window.useLocalPaths = function() {
      var images = document.getElementsByTagName('img');
      for (var i=0; i<images.length; i++) {
        var url = images[i].src;
        if (url.length>0) {
          var bits = url.split('/');
          images[i].src = bits[bits.length-1];
        }
      }
      return true;
    };
  },false);
</script>

In this case, this event listener queries for all image tags and modifies the src attribute by stripping all of the URL except for the image file name. For example if our image tag looked like this,

<img src="http://www.pervasentcdn.com/pervasent.jpg" class="logo" alt="Pervasent" />

it would be come this

<img src="pervasent.jpg" class="logo" alt="Pervasent" />

and thus achieves our goal.

It’s worth noting that the general approach of using UIWebView + Javascript is quite handy and obviously has many possible applications.

Update: If you’re having timing issues with this approach, you may want to take a look at this technique: How To Inject JavaScript Functions Into A UIWebView

written by Jess \\ tags: ,

Oct 02

This week I had the pleasure of both attending and speaking at the 360|iDev iPhone Developers Conference in Denver. Tom and John did an awesome job organizing this conference and they managed to gather an amazing group of speakers and attendees.

My own humble talk was titled UIWebView – The Most Versatile Class in UIKit. A topic that should be familiar to longtime readers of this blog. For the presentation I also took the time to create complete working code examples. Another favorite request around here…

Here are the links to download the presentation and the sample code.

written by Nick \\ tags:

Sep 02

To change the height of the cells in a UITableView, use the property rowHeight. Or change the value in Interface Builder.

There is a method called heightForRowAtIndexPath in UITableViewDelegate, where you can also set the height. However this is NOT recommended. Apple’s release notes states the following about this method:

It is very, very expensive to customize row heights (via tableView:heightForRowAtIndexPath:).

It makes sense that having rows with different heights in your table will wreak havoc with the table view’s reuse of cells. But it also turns out that if you return the same value from this method for each row, you also suffer a significant performance penalty.

So just use the simple rowHeight property. It’s less code to type, and it’s significantly faster.

Thanks to Brent for the performance testing.

Addendum: If you really, really must have different row heights in your table. Then heightForRowAtIndexPath is the only way to achieve this. If your table only has a handful of rows then performance will not be a big issue. But if you have hundreds of rows, all with varying heights, then I would suggest looking at constructing the table using HTML in a web view instead.

written by Nick \\ tags: , ,

Aug 11

In Interface Builder there are several places where you can seemingly set the style of the status bar. In a drop down you can select between None, Gray, Black and Translucent Black. The status bar on the screen in Interface Builder immediately changes to match your selection. But when you run your application you will notice that the status bar is back to the default gray color. What gives?

If you look closely at the Attributes Inspector Window in Interface Builder you will notice that it says “Simulated Interface Elements” above the drop down for the status bar, and a few other settings. This discrete headline is Apple’s way of telling you that the changes you make here only apply to Interface Builder, and the purpose is to help you visually design your screens. But to actually implement these settings you have to do something else. It took me a while to understand this “hidden” meaning too…

Setting the style of the status bar in code is easy enough. In applicationDidFinishLaunching you can add this line of code:

[application setStatusBarStyle:UIStatusBarStyleBlackOpaque];

When you run the app, the status bar will be a pleasing black color. However, if you look closely at the status bar while the app is launching, you will notice that it briefly turns gray. That is of course not acceptable.

So take out the line of code you just added to your application delegate. And instead add this to your Info.plist file:

<key>UIStatusBarStyle</key>
<string>UIStatusBarStyleBlackOpaque</string>

If you prefer to edit/view Info.plist as an XML Property List, it should look like this:
Status bar style = Opaque black style

written by Nick \\ tags: ,

May 11

I was developing an iPhone application screen using the techniques described in my previous post How To Create A Data Entry Screen and I had the additional requirement to hide the keyboard after data entry was complete.

In addition to UIKeyboardWillShowNotification:s I was also getting UIKeyboardWillHideNotification:s so that I would know when the OS hides the keyboard. To my surprise that turns out to be very frequent: each time you move between fields. As each control resigns as first responder an UIKeyboardWillHideNotification is sent, immediately followed by a UIKeyboardWillShowNotification.

The iPhone is smart enough to not actually move the keyboard in and off the display (or it’s done so quickly that it’s imperceptible.) However in the keyboard notification methods I was adjusting the size of the scroll view to match the available screen real estate. And this led to some ugly flickering.

So I created an instance variable: BOOL isEnteringData; to keep track of when the user is actively entering data. When any control on the screen becomes first responder (textFieldDidBeginEditing) then set isEnteringData to YES. When Return or Done is pressed (textFieldShouldReturn) in the last control, then set isEnteringData to NO.

In a keyboardWillHide method I now first check isEnteringData before resizing the scroll view. And flicker be gone.

written by Nick \\ tags: , , ,

May 02

One of the more tedious things in iPhone development is to create functional data entry screens. The challenge is to fit the necessary text fields on the screen and deal with the keyboard that pops up and covers roughly half the screen. There is surprisingly little support for this in the SDK.

Data entry is also one of the more tedious activities for users of your iPhone app, so you should think long and hard about ways to eliminate data entry and make the UI for what you can’t eliminate as user friendly as possible.

This blog post may not offer UI nirvana, but it has some techniques that I’ve found useful on screens with multiple UITextField and UITextView controls. The methods described here are generic enough that they should fit most such screens.

The first step is to create your screen in Interface Builder (or in code if you prefer). The first UI element you need to add is a UIScrollView. It should cover the entire view and be configured to scroll vertically.

Then you place your UITextFields and UITextViews on the UIScrollView. Each data entry control needs to have its delegate set to the view controller so that the controller can act upon events from the controls. In Interface Builder you also configure captitalization, correction, keyboard type, etc for each field. With the exception of the scroll view, this is probably what most of your screens already look like.

Next we’re going to use the versatile “tag” attribute of UIView. The value is tag will be used similar to how tab order is used in other UI technologies. So set the tag to 1 for the data entry field at the top of your screen, 2 for the second, etc.

Now let’s dive into some code. Your controller needs to implement the protocols UITextFieldDelegate and UITextViewDelegate (assuming that you have both types of UI controls in your screen).

@interface MyViewController : UIViewController <UITextFieldDelegate, UITextViewDelegate>

Implement the following methods which are called when a text field or text view becomes the first responder, either by the user tapping inside the field or by your code explicitly requesting it to become the first responder.

#pragma mark UITextFieldDelegate

- (void)textFieldDidBeginEditing:(UITextField *)textField {
	[self scrollViewToCenterOfScreen:textField];
}

#pragma mark UITextViewDelegate

- (void)textViewDidBeginEditing:(UITextView *)textView {
	[self scrollViewToCenterOfScreen:textView];
}

The scrollViewToCenterOfScreen simply takes the frame of the view and positions the scroll view so that the view is in the center of the visible area. The visible area may be significantly reduced by the space taken up by the keyboard. More on that later.

- (void)scrollViewToCenterOfScreen:(UIView *)theView {
	CGFloat viewCenterY = theView.center.y;
	CGRect applicationFrame = [[UIScreen mainScreen] applicationFrame];

	CGFloat availableHeight = applicationFrame.size.height - keyboardBounds.size.height;	// Remove area covered by keyboard

	CGFloat y = viewCenterY - availableHeight / 2.0;
	if (y < 0) {
		y = 0;
	}
	scrollView.contentSize = CGSizeMake(applicationFrame.size.width, applicationFrame.size.height + keyboardBounds.size.height);
	[scrollView setContentOffset:CGPointMake(0, y) animated:YES];
}

Notice that the calculations above used a variable, keyboardBounds.size.height, for the height of the keyboard. The lazy approach would be to just use a constant with the value 216. That would work fine in portrait mode with the current keyboards available in the current iPhone OS. But listen to Apple's warnings: Do not hardcode values like this in your code. Your app will break in the future.

One way to get the accurate size of the keyboard is to observe keyboard notifications.

	[[NSNotificationCenter defaultCenter] addObserver:self
											 selector:@selector(keyboardNotification:)
												 name:UIKeyboardWillShowNotification
											   object:nil];

If your screen allows the keyboard to disappear, then you should also observe the UIKeyboardWillHideNotification.

The keyboardNotification method looks like this:

- (void)keyboardNotification:(NSNotification*)notification {
	NSDictionary *userInfo = [notification userInfo];
	NSValue *keyboardBoundsValue = [userInfo objectForKey:UIKeyboardBoundsUserInfoKey];
	[keyboardBoundsValue getValue:&keyboardBounds];
}

And the declaration of  keyboardBounds:

CGRect keyboardBounds;

The above steps ensure that the current field where the user is entering data is made visible. Now for some extra credit let's use the return key on the keyboard to move from one field to the next. This is where the "tag" attribute will be used.

For UITextFields you can implement textFieldShouldReturn like this:

- (BOOL)textFieldShouldReturn:(UITextField *)textField {
	// Find the next entry field
	for (UIView *view in [self entryFields]) {
		if (view.tag == (textField.tag + 1)) {
			[view becomeFirstResponder];
			break;
		}
	}

	return NO;
}

What this method does is to look through an array of entry fields to find the one with the next higher tag value. The entryFields method looks like this:

/*
 Returns an array of all data entry fields in the view.
 Fields are ordered by tag, and only fields with tag > 0 are included.
 Returned fields are guaranteed to be a subclass of UIResponder.
 */
- (NSArray *)entryFields {
	if (!entryFields) {
		self.entryFields = [[NSMutableArray alloc] init];
		NSInteger tag = 1;
		UIView *aView;
		while (aView = [self.view viewWithTag:tag]) {
			if (aView && [[aView class] isSubclassOfClass:[UIResponder class]]) {
				[entryFields addObject:aView];
			}
			tag++;
		}
	}
	return entryFields;
}

Taken together you now have a pretty good framework for creating usable data entry screens. Please let me know in the comments any improvements you make or any alternative techniques you've used.

written by Nick \\ tags: , , ,