Sep 22

When you work with a static library (e.g. libCoolCode.a) for an iPhone project in Xcode, you can either have a fat binary that contains code for both the iPhone simulator and the iPhone device in the same file, or you may have two separate files that you need to add to Xcode.

Adding a single static library to Xcode is trivial. Here are the step by step instructions for the latter case.

1. Add the files to Xcode

Use the normal Add > Existing Files… to add both the header files and the library files to your project. The result should look something like this:
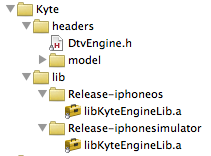
LibraryAndHeaderFilesAddedToXcode.png

2. Add the header files to the search path

A static library comes with one or more header files (.h) that you need to add to your project build settings. (This step is the same for a single library file as for multiple files.)

Open the build settings tab and find the “Header Search Paths” entry, and add the path to the directory with the header files.
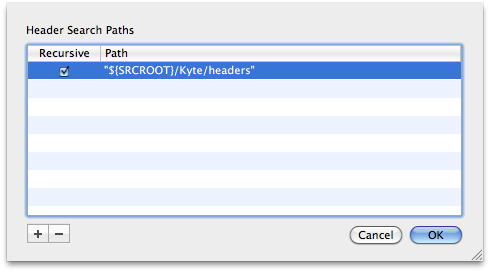
AddHeaderSearchPathToXcodeBuildSettings.png

For this particular library there’s a model directory under the headers directory which also contains headers files. That’s why the Recursive checkbox is checked. The double quotes around the path are needed to handle paths with spaces.

If you try to build the project for the simulator at this point you’ll probably get a compiler warning like this:

file was built for unsupported file format which is not the architecture being linked (i386)

3. Remove the library files from the build target

Open the Targets tab and the target of your project and you’ll see that the library files you just added were also added to the list of libraries to link with.
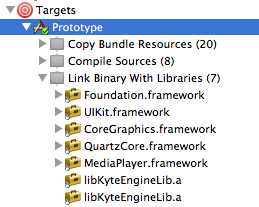
LibraryFilesInTargetLinkFolder.png

Delete these two entries.

You may also have to delete these entries from the build settings. In the build settings tab find the Library Search Paths entry and delete the two entries.
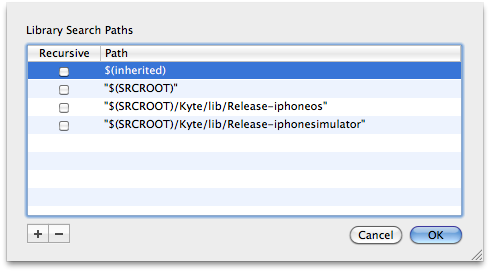
DeleteLibrarySearchPathInXcode.png

That will get rid of the compiler warning above, but the linker will complain since the required libraries are no longer linked.

4. Add the libraries as other linker flags

Again go to the build settings tab and now find the Other Linker Flags (OTHER_LDFLAGS) entry.

Highlight the Other Linker Flags entry and click on the tool drop down button at the bottom of the window.
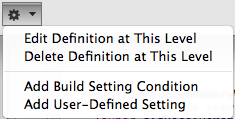
XcodeBuildSettingsToolsDropDownMenu.png

Select Add Build Setting Condition from the drop down menu. This will add a new line under the Other Linker Flags entry. Change the first drop down from Any SDK to Any iOS Simulator. Leave the second drop down as Any Architecture. In the value field enter the path and name of the library file built for the simulator. Repeat this step for the device build, selecting Any iOS Device. The result should look similar to this (your paths will of course be different):

OtherLinkerFlagsConditionalBuildSettings.png

Your project should now compile and run for both the simulator and the device.
written by Nick \\ tags:

Sep 15

A quick tip if you just upgraded to SDK 4.1 and are experiencing strange compilation errors with old projects.

The error may look something like this:

/Developer/Platforms/iPhoneSimulator.platform/Developer/SDKs/iPhoneSimulator4.1.sdk/System/Library/Frameworks/CoreGraphics.framework/Headers/CGPDFContext.h:60:23: error: expected function body after function declarator
   CFDataRef metadata) CG_AVAILABLE_STARTING(__MAC_10_7, __IPHONE_4_0);
                       ^
In file included from /Users/ab/project/project_Prefix.pch:7:

I’ve seen other variations as well, but they seem to stem from the Prefix.pch file, which you probably have not changed in a long time, if at all.

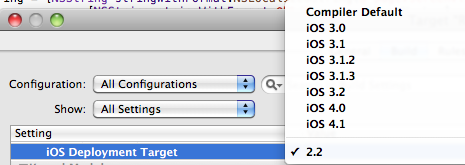
The solution is to update the iOS Deployment Target in your build settings. With SDK 4.1 Apple has helpfully removed the ability to select 2.x as a deployment target.

SelectDeploymentTarget.png

Just select iOS 3.0 or higher from the list, and your mysterious compilation errors should magically disappear.

Note: If you’re using the LLVM compiler and get a similar compilation error and the above solution does not work, check out this Developer Forum thread for a different solution. (That is from the iOS 4.1 Beta Forum, so you need to accept the new iOS Developer Program License Agreement before you can view it.)

written by Nick \\ tags:

Nov 09

UIWebView has very few instance methods. One of them is stringByEvaluatingJavaScriptFromString, which very powerful and unfortunately poorly documented. (This is literally the extent of Apple’s explanation: “Returns the result of running a script.”)

Let’s explore this mysterious method with a couple of examples.

A trivial example of how to use stringByEvaluatingJavaScriptFromString is to get the title of the HTML document:

NSString *title = [webView stringByEvaluatingJavaScriptFromString:@"document.title"];

You would typically place this line of code in webViewDidFinishLoad.

This technique is not limited to one-liners, or accessing simple properties. Here’s an example of two lines of JavaScript code executed in order, as you would expect:

[webView stringByEvaluatingJavaScriptFromString:@"var field = document.getElementById('field_2');"
						 "field.value='Multiple statements - OK';"];

You can also call JavaScript functions this way. And if you want to call a JavaScript function that does not already exist in the web page that you’re downloading, you can “inject” it yourself with this technique:

[webView stringByEvaluatingJavaScriptFromString:@"var script = document.createElement('script');"
						 "script.type = 'text/javascript';"
						 "script.text = \"function myFunction() { "
							"var field = document.getElementById('field_3');"
							"field.value='Calling function - OK';"
						 "}\";"
						 "document.getElementsByTagName('head')[0].appendChild(script);"];

[webView stringByEvaluatingJavaScriptFromString:@"myFunction();"];

In essence I’m using Objective C to create a string which represents JavaScript which which when executed adds a JavaScript function to the HTML DOM. Apologies for the multiple meta levels… Let me try to untangle this line by line.

Line 1 : First we create a <script> element using JavaScript.
Line 2 : Set the type of the <script> element to text/javascript.
Line 3-6 : Set the content of the <script> element to the JavaScript function that you want to inject.
Line 7 : Add the new <script> element as a child to the <head> element of the HTML DOM.
Line 9 : Call the new JavaScript function.

Bonus tip: You can break up NSString constants over multiple lines in Xcode for increased readability. Just end the line with a double-quote character and begin the next line with a double-quote character. At compile time these lines will be joined into one string. So the string that begins with “var script” on Line 1 is one continuous string ending with “appendChild(script);” on Line 7.

Although it’s not critical for the discussion above, here’s the HTML that the example JavaScript refers to:

<html>
  <head>
    <meta name="viewport" content="width=320; initial-scale=1.0; maximum-scale=1.0"/>
  </head>
  <body>		
    <p>This is the UIWebView</p>
    <form>
      <input id="field_1" type="text" name="value" /><br/>
      <input id="field_2" type="text" name="value" /><br/>
      <input id="field_3" type="text" name="value" /><br/>
    </form>
  </body>
</html>	

You can use this generic technique to add JavaScript to any web page that you’re downloading and displaying in a UIWebView. The technique and the possibilities are similar to what you can do with the Greasemonkey plugin for Firefox.

written by Nick \\ tags: , ,

Sep 10

In this post How To Create Conditional Log Statements in Xcode I described how you could add a DEBUG flag to your Xcode project setting so that you could use statements like #ifdef DEBUG in your code.

If you follow the instructions in the post for a 3.0 project you will get an error:

There’s already another key named “GCC_PREPROCESSOR_DEFINITIONS”. Please enter a different name.

If you scroll through all the build settings you will not find one labeled GCC_PREPROCESSOR_DEFINITIONS. This is because this setting has helpfully been relabeled “Preprocessor Macros” and is now listed under the heading GCC 4.2 – Preprocessing:

PreprocessorMacros

To find out how any of these new “helpful” labels are actually translated to compiler settings, click on the Research Assistant button at bottom left corner of the window (the button that looks like a pair of reading classes on top of a stack of books) and you’ll see this:

Xcode Research Assitant

Note that I’ve only seen this change for projects that I’ve created in Xcode 3.1.3 (which by default only have a SDK 3.0 target). Projects that were created in older versions of Xcode (even if they can target SDK 3.0) still show the GCC_PREPROCESSOR_DEFINITIONS label under the heading User-Defined.

written by Nick \\ tags: ,

Aug 07

In the Build Results window of Xcode, the list of errors is not a plain text view so you can’t highlight and copy text from it like you might expect. However you can drag a whole row as a text clipping.

If you drag the error line and drop it onto Safari in the Dock, Safari will open and automagically do a search for the error text. Even though you can only drag a single line, which may not contain the whole error message, it’s usually enough as a search criteria.

I recently encountered the somewhat cryptic error message “___restore_vfp_d8_d15_regs, referenced from:” and after a quick drag-drop-click I had the solution. Nice!

written by Nick

Jun 29

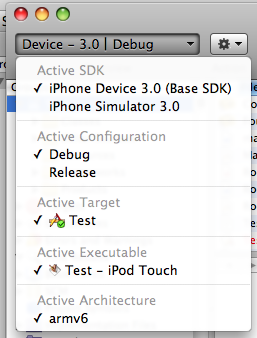
With the 3.0 iPhone SDK a new project will by default have only two options listed under Active SDK: iPhone Device 3.0 and iPhone Simulator 3.0.

Xcode 3.1.3 Default List of Active iPhone SDKs

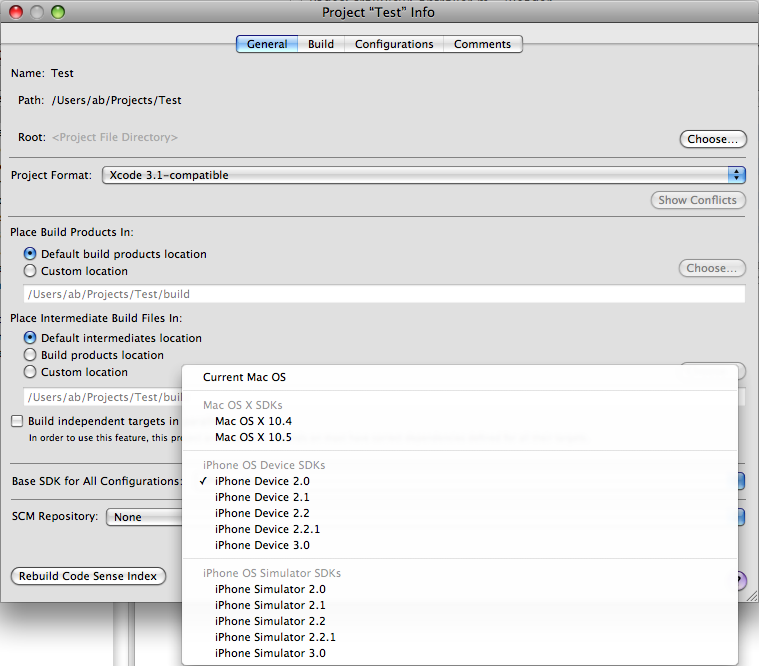
Fortunately Xcode has not forgotten how to create 2.x targeted projects, it’s just that those options seem to be hidden. Xcode usually has multiple ways to accomplish every task. Here’s one way to add the 2.x SDKs to your Xcode drop down:

  1. Select the project file and Get Info.
  2. On the General tab go down to “Base SDK for All Configurations:” and select your desired target SDK from the drop down.

    Xcode 3.1.3 Select Active iPhone SDK

  3. Close the window.
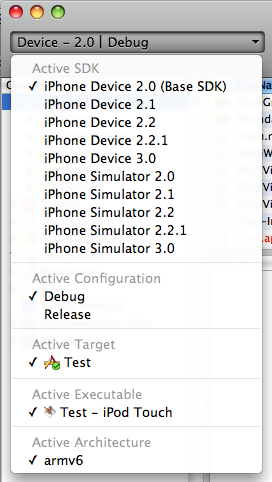
  4. The drop down should now include the new SDK you just selected as an option.

Xcode 3.1.3 Updated List of Active iPhone SDKs

written by Nick \\ tags:

May 12

Coming from a Java and Eclipse world, I was spoiled by great tool support for creating accessor methods (“getters” and “setters”). Xcode is sorely lacking in this area. On my current enterprise iPhone project we have a lot of domain objects and I wasn’t looking forward to typing all those accessor methods.

After some searching I came across the tool for the job: Kevin Callahan’s Accessorizer. While it’s not an Xcode plugin (it runs as a separate app), a few clever keyboard shortcuts makes it very easy to highlight your instance variables in the Xcode editor and automagically fill in the rest of the declaration and implementation. Watch the video on Kevin’s site to see how it works.

If you’re a contract iPhone developer and you think you’ll spend more than 7.5 minutes typing accessor methods over the course of the rest of your career, then Accessorizer will pay for itself. No, this is not an affiliate promotion. I just like the tool.

In Objective-C 2.0 we tend to use the @synthesize and @property statements so often that we forget how to correctly write a setter method without causing memory leaks. A bonus feature of Accessorizer is that you can study all the correct code it generates.

written by Nick

Apr 08

When you add a framework to your project in Xcode, make sure you use Path Type = “Relative to Current SDK”. There is no option for this when you add the framework. So after the framework has been added to your project, command-click on the framework and select Get Info.

Your paths should look something like this:
System/Library/Frameworks/AudioToolbox.framework

Why is this important?

When you start developing using both the iPhone simulator and an actual iPhone device you technically switch SDK based on your target. And it’s a real pain to have to adjust all the framework paths each time.

written by Nick