Jun 29

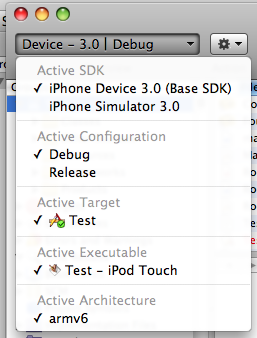
With the 3.0 iPhone SDK a new project will by default have only two options listed under Active SDK: iPhone Device 3.0 and iPhone Simulator 3.0.

Xcode 3.1.3 Default List of Active iPhone SDKs

Fortunately Xcode has not forgotten how to create 2.x targeted projects, it’s just that those options seem to be hidden. Xcode usually has multiple ways to accomplish every task. Here’s one way to add the 2.x SDKs to your Xcode drop down:

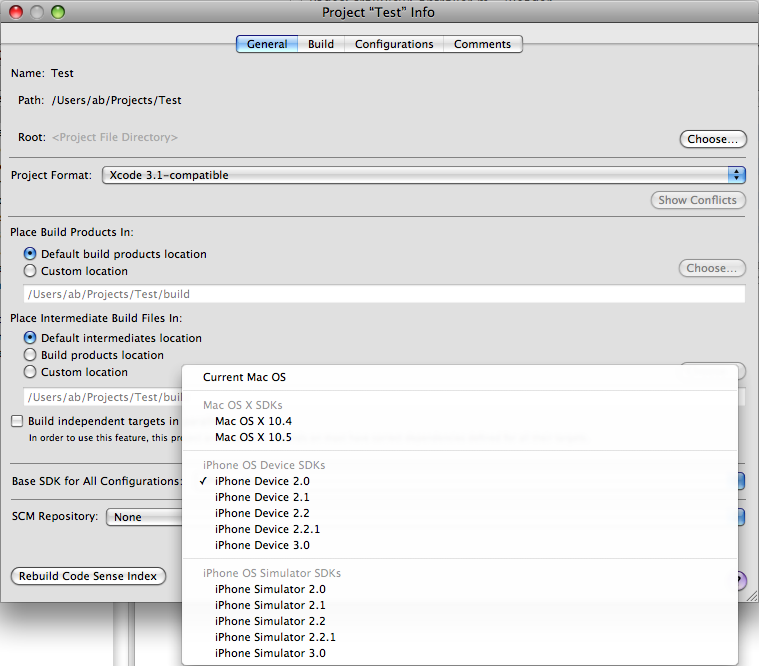
  1. Select the project file and Get Info.
  2. On the General tab go down to “Base SDK for All Configurations:” and select your desired target SDK from the drop down.

    Xcode 3.1.3 Select Active iPhone SDK

  3. Close the window.
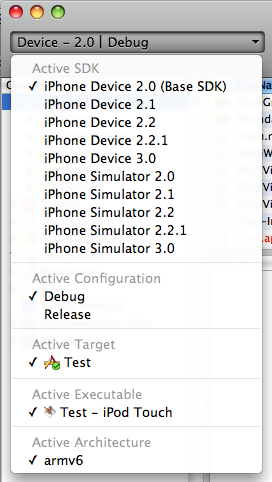
  4. The drop down should now include the new SDK you just selected as an option.

Xcode 3.1.3 Updated List of Active iPhone SDKs

written by Nick \\ tags:

Jun 17

Sorry about the long absence from the blog. I’ve been busy working on several 3.0 projects. One of the apps I worked on was showcased during Apple’s keynote at WWDC. That was really cool!

  • 3.0 was released to the eagerly waiting public today. For us developers this is mostly an non-event since we’ve been working with the new features for quite a while. Just one note on upgrading your iPhone: During the upgrade process there is a step where you phone has to be re-activated and I’ve read reports that this activation server has been struggling under the immense load today. You may want to hold off slightly with upgrading your primary phone until the frenzy is over, otherwise you might temporarily end up with a phone that is only capable of making emergency calls. Friday is probably also a bad day since the 3G S will go on sale. At least Apple had the sense this year not to launch both the software upgrade and the new iPhone on the same day.
  • The new App Store is live with parental controls. If you haven’t logged in to iTunes Connect for a while you might want to do that and set the parental control settings for your apps. I don’t know what will happen if you don’t specify a rating. But unless you have over 500 apps on the store like one of my clients, then it’s a pretty quick process. And it will provide good information for you potential customers.
  • Now that the NDA is lifted for 3.0, expect to see some 3.0 related posts here. How do you write apps that take advantage of 3.0 and still work on 2.x? Anybody struggling with In App Purchases? Stay tuned.

written by Nick \\ tags:

Jun 01

I was part of the team that developed the People Celebrity News Tracker which launched last week. It has since then hit #13 on the top list of all paid apps. Apple’s promotion of the app on the App Store home page was a nice endorsement, and no doubt helped the sales.

People Celebrity News Tracker promoted in iTunes App Store

If you search for “celebrity” in the App Store the #1 search result is the People app. And #3 is another app that I worked on: Funniest Celebrity Quotes, Jokes & Bloopers.

After cornering the market on celebrity apps I need a break to spend some time in the real world again. 🙂

written by Nick

May 12

Coming from a Java and Eclipse world, I was spoiled by great tool support for creating accessor methods (“getters” and “setters”). Xcode is sorely lacking in this area. On my current enterprise iPhone project we have a lot of domain objects and I wasn’t looking forward to typing all those accessor methods.

After some searching I came across the tool for the job: Kevin Callahan’s Accessorizer. While it’s not an Xcode plugin (it runs as a separate app), a few clever keyboard shortcuts makes it very easy to highlight your instance variables in the Xcode editor and automagically fill in the rest of the declaration and implementation. Watch the video on Kevin’s site to see how it works.

If you’re a contract iPhone developer and you think you’ll spend more than 7.5 minutes typing accessor methods over the course of the rest of your career, then Accessorizer will pay for itself. No, this is not an affiliate promotion. I just like the tool.

In Objective-C 2.0 we tend to use the @synthesize and @property statements so often that we forget how to correctly write a setter method without causing memory leaks. A bonus feature of Accessorizer is that you can study all the correct code it generates.

written by Nick

May 11

I was developing an iPhone application screen using the techniques described in my previous post How To Create A Data Entry Screen and I had the additional requirement to hide the keyboard after data entry was complete.

In addition to UIKeyboardWillShowNotification:s I was also getting UIKeyboardWillHideNotification:s so that I would know when the OS hides the keyboard. To my surprise that turns out to be very frequent: each time you move between fields. As each control resigns as first responder an UIKeyboardWillHideNotification is sent, immediately followed by a UIKeyboardWillShowNotification.

The iPhone is smart enough to not actually move the keyboard in and off the display (or it’s done so quickly that it’s imperceptible.) However in the keyboard notification methods I was adjusting the size of the scroll view to match the available screen real estate. And this led to some ugly flickering.

So I created an instance variable: BOOL isEnteringData; to keep track of when the user is actively entering data. When any control on the screen becomes first responder (textFieldDidBeginEditing) then set isEnteringData to YES. When Return or Done is pressed (textFieldShouldReturn) in the last control, then set isEnteringData to NO.

In a keyboardWillHide method I now first check isEnteringData before resizing the scroll view. And flicker be gone.

written by Nick \\ tags: , , ,

May 02

One of the more tedious things in iPhone development is to create functional data entry screens. The challenge is to fit the necessary text fields on the screen and deal with the keyboard that pops up and covers roughly half the screen. There is surprisingly little support for this in the SDK.

Data entry is also one of the more tedious activities for users of your iPhone app, so you should think long and hard about ways to eliminate data entry and make the UI for what you can’t eliminate as user friendly as possible.

This blog post may not offer UI nirvana, but it has some techniques that I’ve found useful on screens with multiple UITextField and UITextView controls. The methods described here are generic enough that they should fit most such screens.

The first step is to create your screen in Interface Builder (or in code if you prefer). The first UI element you need to add is a UIScrollView. It should cover the entire view and be configured to scroll vertically.

Then you place your UITextFields and UITextViews on the UIScrollView. Each data entry control needs to have its delegate set to the view controller so that the controller can act upon events from the controls. In Interface Builder you also configure captitalization, correction, keyboard type, etc for each field. With the exception of the scroll view, this is probably what most of your screens already look like.

Next we’re going to use the versatile “tag” attribute of UIView. The value is tag will be used similar to how tab order is used in other UI technologies. So set the tag to 1 for the data entry field at the top of your screen, 2 for the second, etc.

Now let’s dive into some code. Your controller needs to implement the protocols UITextFieldDelegate and UITextViewDelegate (assuming that you have both types of UI controls in your screen).

@interface MyViewController : UIViewController <UITextFieldDelegate, UITextViewDelegate>

Implement the following methods which are called when a text field or text view becomes the first responder, either by the user tapping inside the field or by your code explicitly requesting it to become the first responder.

#pragma mark UITextFieldDelegate

- (void)textFieldDidBeginEditing:(UITextField *)textField {
	[self scrollViewToCenterOfScreen:textField];
}

#pragma mark UITextViewDelegate

- (void)textViewDidBeginEditing:(UITextView *)textView {
	[self scrollViewToCenterOfScreen:textView];
}

The scrollViewToCenterOfScreen simply takes the frame of the view and positions the scroll view so that the view is in the center of the visible area. The visible area may be significantly reduced by the space taken up by the keyboard. More on that later.

- (void)scrollViewToCenterOfScreen:(UIView *)theView {
	CGFloat viewCenterY = theView.center.y;
	CGRect applicationFrame = [[UIScreen mainScreen] applicationFrame];

	CGFloat availableHeight = applicationFrame.size.height - keyboardBounds.size.height;	// Remove area covered by keyboard

	CGFloat y = viewCenterY - availableHeight / 2.0;
	if (y < 0) {
		y = 0;
	}
	scrollView.contentSize = CGSizeMake(applicationFrame.size.width, applicationFrame.size.height + keyboardBounds.size.height);
	[scrollView setContentOffset:CGPointMake(0, y) animated:YES];
}

Notice that the calculations above used a variable, keyboardBounds.size.height, for the height of the keyboard. The lazy approach would be to just use a constant with the value 216. That would work fine in portrait mode with the current keyboards available in the current iPhone OS. But listen to Apple's warnings: Do not hardcode values like this in your code. Your app will break in the future.

One way to get the accurate size of the keyboard is to observe keyboard notifications.

	[[NSNotificationCenter defaultCenter] addObserver:self
											 selector:@selector(keyboardNotification:)
												 name:UIKeyboardWillShowNotification
											   object:nil];

If your screen allows the keyboard to disappear, then you should also observe the UIKeyboardWillHideNotification.

The keyboardNotification method looks like this:

- (void)keyboardNotification:(NSNotification*)notification {
	NSDictionary *userInfo = [notification userInfo];
	NSValue *keyboardBoundsValue = [userInfo objectForKey:UIKeyboardBoundsUserInfoKey];
	[keyboardBoundsValue getValue:&keyboardBounds];
}

And the declaration of  keyboardBounds:

CGRect keyboardBounds;

The above steps ensure that the current field where the user is entering data is made visible. Now for some extra credit let's use the return key on the keyboard to move from one field to the next. This is where the "tag" attribute will be used.

For UITextFields you can implement textFieldShouldReturn like this:

- (BOOL)textFieldShouldReturn:(UITextField *)textField {
	// Find the next entry field
	for (UIView *view in [self entryFields]) {
		if (view.tag == (textField.tag + 1)) {
			[view becomeFirstResponder];
			break;
		}
	}

	return NO;
}

What this method does is to look through an array of entry fields to find the one with the next higher tag value. The entryFields method looks like this:

/*
 Returns an array of all data entry fields in the view.
 Fields are ordered by tag, and only fields with tag > 0 are included.
 Returned fields are guaranteed to be a subclass of UIResponder.
 */
- (NSArray *)entryFields {
	if (!entryFields) {
		self.entryFields = [[NSMutableArray alloc] init];
		NSInteger tag = 1;
		UIView *aView;
		while (aView = [self.view viewWithTag:tag]) {
			if (aView && [[aView class] isSubclassOfClass:[UIResponder class]]) {
				[entryFields addObject:aView];
			}
			tag++;
		}
	}
	return entryFields;
}

Taken together you now have a pretty good framework for creating usable data entry screens. Please let me know in the comments any improvements you make or any alternative techniques you've used.

written by Nick \\ tags: , , ,

Apr 24

iPhone development us usually very enjoyable using the Apple’s excellent development tools. However, Apple’s user experience experts must have been on vacation when they designed the iPhone code signing process. Particularly the error messages seem to be designed to confuse rather than help.

This happened on a project where we have multiple iPhone developers both at our company and at the client working in parallel. One day out of the blue we were greeted with the dreaded “unexpected error (0xE800003A)” when deploying to our development devices. Since it’s been about a year since the iPhone development program started, the first thought was that a certificate had expired.

A a wild goose chase ensued following Craig Hockenberry’s sage advice regarding expired certificates, with several variations and extensions, and other fascinating dead-ends. Still same unhelpful error message.

Finally we discovered that one developer had created an AdHoc configuration and in that process created the Entitlements.plist file. That is all well and good. But he had added Entitlements.plist to both the AdHoc and the Debug configuration. Not so good.

Bad Code Signing Settings

After removing that one line in the build settings, normality was restored.

Hopefully this will save someone else a few hours and some sanity.

Other good code signing resources:

written by Nick

Apr 22

I’m honored and humbled to have created the App Store Pick of the Week. Please check out The Green Book, a real book bestseller published on the iPhone using the TRIBE reader.

App Store Pick of The Week: The Green Book

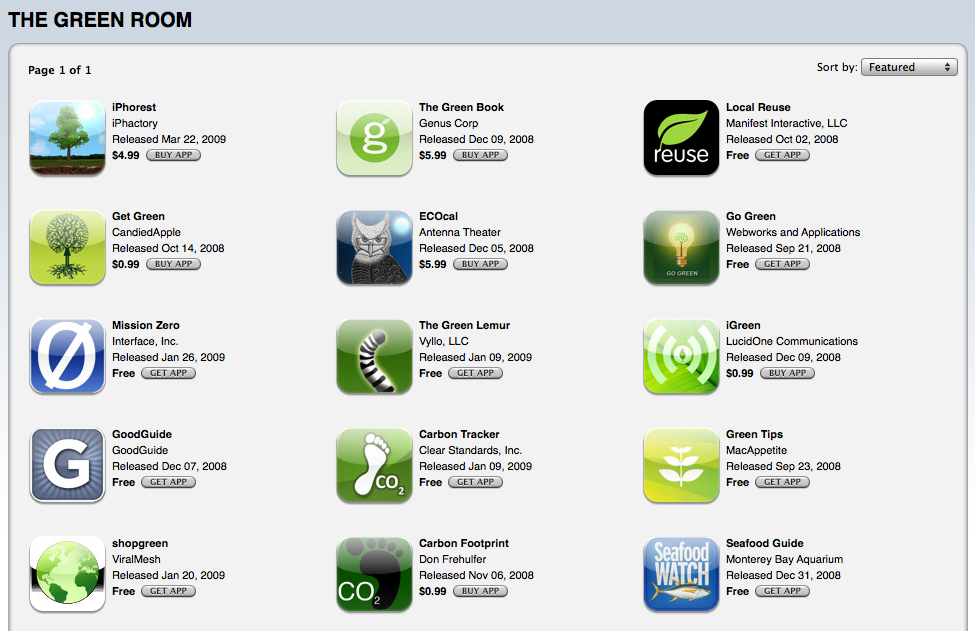
Apple has created a new Green Room section in the app store in time for Earth Day. And The Green Book is also featured here.

The Green Book featured in The Green Room

Congratulations Genus!

written by Nick

Apr 03

My previous post about conditional logging received quite a few responses, with several people pointing out that littering your code with #ifdef DEBUG statements is both ugly and error prone. Karl Kraft, for example, created a new DebugLog class as a drop-in replacement for NSLog.

Since NSLog has been around for quite a while, there have been many solutions to this problem.

CocoaDev suggests this macro:

#if MY_DEBUG_FLAG
#define DEBUG_OUTPUT( a )         NSLog( a )
#define DEBUG_OUTPUT1( a, b )     NSLog( a, b )
#else
#define DEBUG_OUTPUT( a )         // (a)
#define DEBUG_OUTPUT1( a, b )     // (a,b)
#endif

Enumerating all the variants with different number of parameters gets a bit tedious, so with Objective-C 2.0 C99 you can use varargs macros:

#define DEBUG_OUTPUT(fmt, ...) NSLog(fmt, ## __VA_ARGS__)

As described by Fraser Hess in Dropping NSLog in release builds you can put this in your <AppName>_Prefix.pch file:

#ifdef DEBUG
#    define DLog(...) NSLog(__VA_ARGS__)
#else
#    define DLog(...) /* */
#endif
#define ALog(...) NSLog(__VA_ARGS__)

Use ALog for cases where you always want log output regardless of the state of the debug flag. I like this preprocessor macro approach because you don’t have to carry around extra classes in all your projects. Just a few lines of code to paste into one file in your project.

But I think we can improve it further.

The built-in macro __PRETTY_FUNCTION__ is pretty nifty in that it outputs the name of the class and the method where it’s running. Mark Damon Huges uses this in his Cocoa logging macro:

#ifdef DEBUG
// DLOG takes a format argument (which must begin %s) and 0 or more args:
// DLOG(@"%s");
// DLOG(@"%s: %d", x);
#define DLOG(fmt, ...) NSLog(fmt, __PRETTY_FUNCTION__, ##__VA_ARGS__)
#else
#define DLOG(...)
#endif

A drawback with this macro is that it requires you to add a “%s” to all your log statements, e.g. DLOG(@”%s foo”); instead of NSLog(@”foo”);. So it’s not a drop-in replacement for NSLog.

Let’s try to fix that.

#define DLog(fmt, ...) NSLog((@"%s " fmt), __PRETTY_FUNCTION__, ##__VA_ARGS__);

Now you can do DLog(@”foo”); as well as pass in parameters like DLog(@”value: %d”, x);

One final touch is to add the line number:

#define DLog(fmt, ...) NSLog((@"%s [Line %d] " fmt), __PRETTY_FUNCTION__, __LINE__, ##__VA_ARGS__);

Now if you’re lazy and you want to know that execution has reached a particular line, you can just use DLog();

So here is the complete listing of the macro:

// DLog is almost a drop-in replacement for NSLog
// DLog();
// DLog(@"here");
// DLog(@"value: %d", x);
// Unfortunately this doesn't work DLog(aStringVariable); you have to do this instead DLog(@"%@", aStringVariable);
#ifdef DEBUG
#	define DLog(fmt, ...) NSLog((@"%s [Line %d] " fmt), __PRETTY_FUNCTION__, __LINE__, ##__VA_ARGS__);
#else
#	define DLog(...)
#endif

// ALog always displays output regardless of the DEBUG setting
#define ALog(fmt, ...) NSLog((@"%s [Line %d] " fmt), __PRETTY_FUNCTION__, __LINE__, ##__VA_ARGS__);

Set the DEBUG variable in your project as described previously. Update: If your project is 3.0 you may need to set the DEBUG variable this way.

I’m sure there will be further improvements to this. Comments are open as always.

written by Nick \\ tags:

Apr 01

Allowing 3rd party iPhone applications to run in the background is an often requested feature in the official SDK. Apple has responded that they can’t do that primarily due the increased, and unpredictable, battery drain. However Apple is also notorious for claiming that they are not working on something and they have absolutely no interest in working on it, until they surprise everybody with a working solution. With that in mind I decided to poke around a bit in the new 3.0 SDK.

There are 1,000 new API:s in 3.0, so there’s a fair amount of ground to cover, but a new framework called AsyncPRocessIngLibrary caught my attention. I have not been able to find any documentation for this framework, but it’s not in the PrivateFrameworks directory, so it’s presumably fair game.

Here’s an example of what you can do with this library that was discovered today:

UInt32 numProcessors = MPProcessorsScheduled();
/* Schedule task across available processors.
   Major hint of new hardware... */
for (n = 0; n < numProcessors; n++ ) {
   MPCreateTask( MyTask, kMPStackSize, NULL, NULL, taskOptions, taskID );
}

This is all pretty standard multi processing code. What’s new and interesting here is the taskOptions:

enum {
   MPTaskOptionNone                   = 0,
   MPTaskOptionTerminateOnAppExit     = 1 << 0,
   MPTaskOptionTerminateOnThreadDeath = 1 << 1,
   MPTaskOptionTerminateOnSemaphore   = 1 << 2,
   MPTaskOptionKeepRunning            = 1 << 3,
   MPTaskOptionLurad                  = 1 << 4,
   MPTaskOptionGetauscht              = 1 << 5
};
typedef UInt32 MPTaskOption;

Most of these flags are self-explanatory, but unless you set the 4/1 bit, they don’t behave as expected.

Example:

UInt32 taskOptions = (MPTaskOptionKeepRunning | MPTaskOptionLurad);

It’s important that before attempting to launch your background process, you first need to ensure that the device you’re running on is capable of this:

if ([[UIDevice currentDevice] isProcessFoolEnabled]) {
// start your process here
}

written by Nick \\ tags: