When you work with a static library (e.g. libCoolCode.a) for an iPhone project in Xcode, you can either have a fat binary that contains code for both the iPhone simulator and the iPhone device in the same file, or you may have two separate files that you need to add to Xcode.
Adding a single static library to Xcode is trivial. Here are the step by step instructions for the latter case.
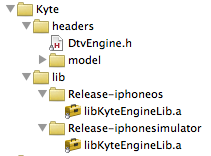
1. Add the files to Xcode
Use the normal Add > Existing Files… to add both the header files and the library files to your project. The result should look something like this:
2. Add the header files to the search path
A static library comes with one or more header files (.h) that you need to add to your project build settings. (This step is the same for a single library file as for multiple files.)
Open the build settings tab and find the “Header Search Paths” entry, and add the path to the directory with the header files.
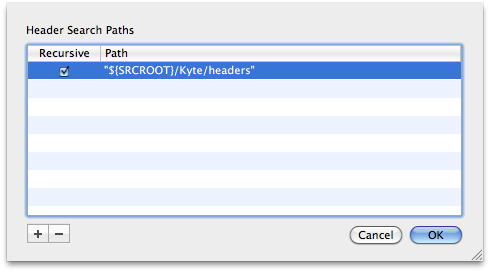
For this particular library there’s a model directory under the headers directory which also contains headers files. That’s why the Recursive checkbox is checked. The double quotes around the path are needed to handle paths with spaces.
If you try to build the project for the simulator at this point you’ll probably get a compiler warning like this:
file was built for unsupported file format which is not the architecture being linked (i386)
3. Remove the library files from the build target
Open the Targets tab and the target of your project and you’ll see that the library files you just added were also added to the list of libraries to link with.
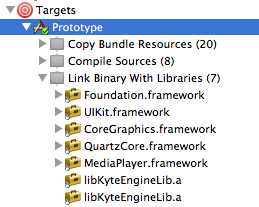
Delete these two entries.
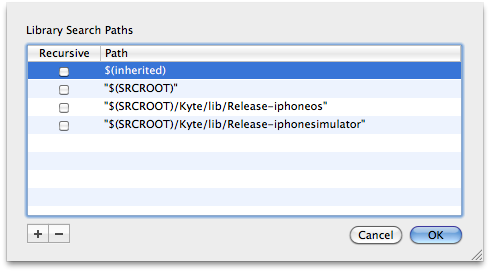
You may also have to delete these entries from the build settings. In the build settings tab find the Library Search Paths entry and delete the two entries.
That will get rid of the compiler warning above, but the linker will complain since the required libraries are no longer linked.
4. Add the libraries as other linker flags
Again go to the build settings tab and now find the Other Linker Flags (OTHER_LDFLAGS) entry.
Highlight the Other Linker Flags entry and click on the tool drop down button at the bottom of the window.
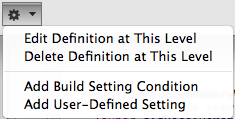
Select Add Build Setting Condition from the drop down menu. This will add a new line under the Other Linker Flags entry. Change the first drop down from Any SDK to Any iOS Simulator. Leave the second drop down as Any Architecture. In the value field enter the path and name of the library file built for the simulator. Repeat this step for the device build, selecting Any iOS Device. The result should look similar to this (your paths will of course be different):
![]()
Your project should now compile and run for both the simulator and the device.
September 22nd, 2010 at 11:32
Good tip, i was looking for something Iike this a few weeks ago, and found you can make a fat library using lipo. I combined an i386, armv6, and armv7 thumb into one. Xcode links it just fine and strips out the unused architectures.
September 22nd, 2010 at 14:04
@Dan: Yes, that is another option which works well with your own static libraries. But if you get static libraries from a third party then you would have to rebuild the fat library each time there’s an update.
September 23rd, 2010 at 03:22
That’s a nice idea, the other possibility that I recently stumbled upon is to create XCode cross-project references and build static libraries on demand. I found this blog post interesting: http://www.clintharris.net/2009/iphone-app-shared-libraries/
September 23rd, 2010 at 13:26
> That’s a nice idea, the other possibility that I recently stumbled upon is to create
> XCode cross-project references and build static libraries on demand.
Not only was ‘on demand’ the only sane option for me, but it works flawlessly, ALL the time. You can modify code anywhere in the static library or in the project that uses it, and everything is saved and built automatically using the build settings of the main project.
Do it the ‘on demand’ way and you’ll likely never expend any effort thinking about it again.
June 5th, 2012 at 14:36
Thanks for a very clear article. I’m fairly new to Xcode so I don’t know if this is a new feature in 4.3 but I noticed that you can create sections underneath the Library Search Paths where it’s customised for particular architectures. (There’s a not hugely-obvious “plus” button.)
One gotcha which caused me to copy the wrong library, the “Show in Finder” option on build products seems a bit unreliable in reacting to architecture changes. I didn’t notice at first but when I clicked on my built library to show it, it went to the iPhone folder rather than simulator.
A default build area “Products” will contain four dirs, Debug-iiphoneos, Debug-iphonesimulator, Release…