- In Finder navigate to your Xcode project.
- Create a new folder called Settings.
- Inside the folder create a new file called Root.plist. See below for an empty Root.plist example.
- Rename the Settings folder to Settings.bundle. Finder will ask if you really want to do this. You do. Root.plist will “disappear” into the Settings.bundle file.
- In Xcode Command-click on Resources in your project. Select Add > Existing Files…
- Select Settings.bundle and click Add twice.
- You should now see the Settings.bundle file in Xcode and if you expand it Root.plist will appear again.
If you know of a less convoluted way to create this structure in Xcode, please let me know in the comments.
Empty Root.plist file:
<?xml version="1.0" encoding="UTF-8"?>
<!DOCTYPE plist PUBLIC "-//Apple Computer//DTD PLIST 1.0//EN" "http://www.apple.com/DTDs/PropertyList-1.0.dtd">
<!--
   Root.plist
   Preference settings for MyApp
-->
<plist version="1.0">
    <dict>

    </dict>
</plist>
Edit Root.plist
If you double click on Root.plist in Xcode the file will open in a standard text editor. A better alternative is to command-click Root.plist and select Open With Finder. That will open the Property List Editor.
- Expand the Root node and click the New Child button.
- Name the child Title, select the String class and enter the name of your application as the value.
- With the new Title node selected, click the New Sibling button.
- Name the new node PreferenceSpecifiers, and select the Array class. (You can’t enter a value for an Array.)
- With the PreferenceSpecifiers node selected, click the New Child button.
- Select the class Dictionary for the new node. (You can’t change the name of the node nor the value for a Dictionary entry.)
- Expand the new node and click on the New Child button.
- Name the new child Title, leave it as a String class, and give it a value that will have meaning to a user of your application.
- Click on the New Sibling button. Give the node these values: name = Type, class = String, value = PSTextFieldSpecifier. This will allow a user to enter a preference value in a text field.
- Click on the New Sibling button. Give the node these values: name = Key, class = String, value = something that has meaning in your code. This is the key your code will use to lookup this preference value.
- Click on the New Sibling button. Give the node these values: name = DefaultValue, class = String, value = a meaningful default. This value will be used unless the user has set the preference to something else.
- Save the Root.plist file.
If you expand all the nodes in the Property File Editor it should look something like this:
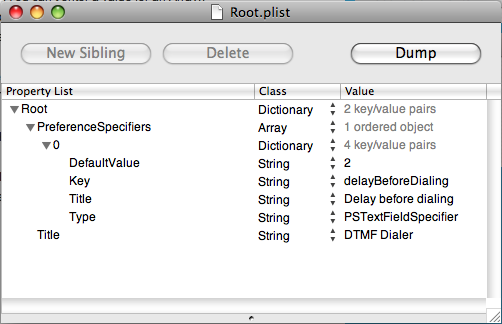
If you view the file in an Xcode text editor it will look like this:
<?xml version="1.0" encoding="UTF-8"?>
<!DOCTYPE plist PUBLIC "-//Apple//DTD PLIST 1.0//EN" "http://www.apple.com/DTDs/PropertyList-1.0.dtd">
<plist version="1.0">
<dict>
	<key>PreferenceSpecifiers</key>
	<array>
		<dict>
			<key>DefaultValue</key>
			<string>2</string>
			<key>Key</key>
			<string>delayBeforeDialing</string>
			<key>Title</key>
			<string>Delay before dialing</string>
			<key>Type</key>
			<string>PSTextFieldSpecifier</string>
		</dict>
	</array>
	<key>Title</key>
	<string>DTMF Dialer</string>
</dict>
</plist>
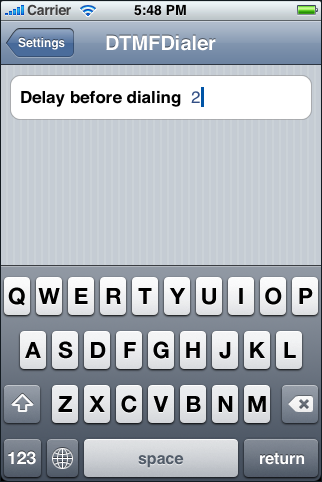
Build and run your app. Exit your app and tap the Settings app. You should now see a new entry that matches the name of your app. Tap this entry and your own custom preferences will show up. The user can edit and save these preferences without you having to write any code. Pretty neat.
Multi Value Specifier Preference
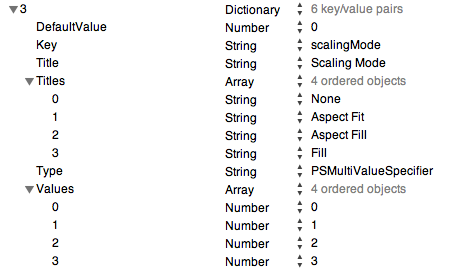
If the user should select between multiple pre-defined values you can use a PSMultiValueSpecifier. Enter the visible titles as an Array under the name Titles, and the values your code sees as an Array under the name Values.
Something like this:
Other Types of Preference Values
- PSToggleSwitchSpecifier – for boolean values
- PSSliderSpecifier – for a range of values