Mar 26

A UITextView is great for displaying multiple lines of simple text. But when you need something more fancy, like headlines or highlighting text, then you should look at UIWebView. It’s not just capable of displaying web pages from a URL, but you can also specify the HTML you want to display as a string.

Create a UIWebView in a controller:

- (void)loadView
{
  // Create a custom view hierarchy.
  CGRect appFrame = [[UIScreen mainScreen] applicationFrame];
  UIView *view = [[UIView alloc] initWithFrame:appFrame];
  view.autoresizingMask = UIViewAutoresizingFlexibleHeight|UIViewAutoresizingFlexibleWidth;
  self.view = view;
  [view release];

  CGRect webFrame = [[UIScreen mainScreen] applicationFrame];
  webView = [[UIWebView alloc] initWithFrame:webFrame];
  webView.backgroundColor = [UIColor whiteColor];
  [self.view addSubview:webView];
}

Then you can add your rich text to the view like this:

NSString *html = @"<html><head><title>The Meaning of Life</title></head><body><p>...really is <b>42</b>!</p></body></html>";
[webView loadHTMLString:html baseURL:nil];

The documentation is not very clear on what the baseURL is used for in the context of HTML that is loaded from a string.

written by Nick \\ tags: ,

Mar 25

After yesterday’s elaborate tutorial on how to create a Preferences UI, accessing the preferences from your code is a snap.

NSUserDefaults *userDefaults = [NSUserDefaults standardUserDefaults];
delayBeforeDialing = [userDefaults floatForKey:@"delayBeforeDialing"];

The key, “delayBeforeDialing” in this example, needs to match the Key value in Root.plist.

There are different accessor methods depending on the type of variable you want to retrieve.

  • arrayForKey
  • boolForKey
  • dataForKey
  • dictionaryForKey
  • floatForKey
  • integerForKey
  • objectForKey
  • stringArrayForKey
  • stringForKey

You don’t have to use a UI for your preferences. If you just want to conveniently store values associated with your application, that you can read back later, you can use the setter methods of NSUserDefaults.

[userDefaults setFloat:delayBeforeDialing forKey:@"delayBeforeDialing"];

Read back the values as above.

written by Nick \\ tags:

Mar 24
  1. In Finder navigate to your Xcode project.
  2. Create a new folder called Settings.
  3. Inside the folder create a new file called Root.plist. See below for an empty Root.plist example.
  4. Rename the Settings folder to Settings.bundle. Finder will ask if you really want to do this. You do. Root.plist will “disappear” into the Settings.bundle file.
  5. In Xcode Command-click on Resources in your project. Select Add > Existing Files…
  6. Select Settings.bundle and click Add twice.
  7. You should now see the Settings.bundle file in Xcode and if you expand it Root.plist will appear again.

If you know of a less convoluted way to create this structure in Xcode, please let me know in the comments.


Empty Root.plist file:

<?xml version="1.0" encoding="UTF-8"?>
<!DOCTYPE plist PUBLIC "-//Apple Computer//DTD PLIST 1.0//EN" "http://www.apple.com/DTDs/PropertyList-1.0.dtd">
<!--
   Root.plist
   Preference settings for MyApp
-->
<plist version="1.0">
    <dict>

    </dict>
</plist>


Edit Root.plist

If you double click on Root.plist in Xcode the file will open in a standard text editor. A better alternative is to command-click Root.plist and select Open With Finder. That will open the Property List Editor.

  1. Expand the Root node and click the New Child button.
  2. Name the child Title, select the String class and enter the name of your application as the value.
  3. With the new Title node selected, click the New Sibling button.
  4. Name the new node PreferenceSpecifiers, and select the Array class. (You can’t enter a value for an Array.)
  5. With the PreferenceSpecifiers node selected, click the New Child button.
  6. Select the class Dictionary for the new node. (You can’t change the name of the node nor the value for a Dictionary entry.)
  7. Expand the new node and click on the New Child button.
  8. Name the new child Title, leave it as a String class, and give it a value that will have meaning to a user of your application.
  9. Click on the New Sibling button. Give the node these values: name = Type, class = String, value = PSTextFieldSpecifier. This will allow a user to enter a preference value in a text field.
  10. Click on the New Sibling button. Give the node these values: name = Key, class = String, value = something that has meaning in your code. This is the key your code will use to lookup this preference value.
  11. Click on the New Sibling button. Give the node these values: name = DefaultValue, class = String, value = a meaningful default. This value will be used unless the user has set the preference to something else.
  12. Save the Root.plist file.

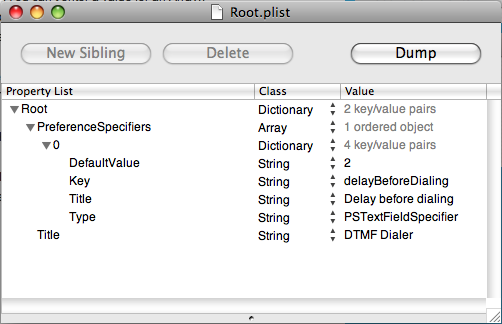
If you expand all the nodes in the Property File Editor it should look something like this:

Root.plist

If you view the file in an Xcode text editor it will look like this:

<?xml version="1.0" encoding="UTF-8"?>
<!DOCTYPE plist PUBLIC "-//Apple//DTD PLIST 1.0//EN" "http://www.apple.com/DTDs/PropertyList-1.0.dtd">
<plist version="1.0">
<dict>
	<key>PreferenceSpecifiers</key>
	<array>
		<dict>
			<key>DefaultValue</key>
			<string>2</string>
			<key>Key</key>
			<string>delayBeforeDialing</string>
			<key>Title</key>
			<string>Delay before dialing</string>
			<key>Type</key>
			<string>PSTextFieldSpecifier</string>
		</dict>
	</array>
	<key>Title</key>
	<string>DTMF Dialer</string>
</dict>
</plist>


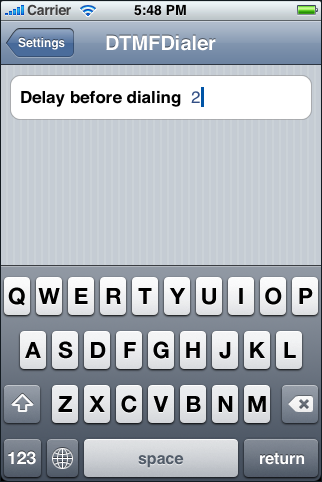
Build and run your app. Exit your app and tap the Settings app. You should now see a new entry that matches the name of your app. Tap this entry and your own custom preferences will show up. The user can edit and save these preferences without you having to write any code. Pretty neat.

Custom Settings


Multi Value Specifier Preference

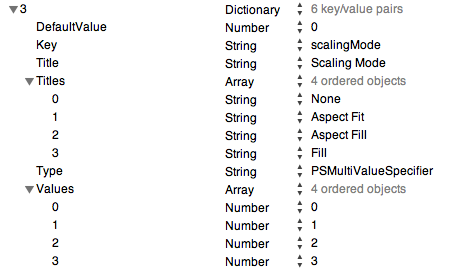
If the user should select between multiple pre-defined values you can use a PSMultiValueSpecifier. Enter the visible titles as an Array under the name Titles, and the values your code sees as an Array under the name Values.

Something like this:

MultiValueSpecifier


Other Types of Preference Values

  • PSToggleSwitchSpecifier – for boolean values
  • PSSliderSpecifier – for a range of values

written by Nick \\ tags: , , , , , , ,

Mar 14

Today is March 14th (3/14 in American date format) which has a striking similarity to an approximation of the mathematical constant pi (3.14159265…)

Therefore math geeks are of course celebrating Pi Day today.

written by Nick

Mar 10

Playing audio with the iPhone Software Development Kit (SDK) should be easy, right? After all this is an iPod – the music jukebox.

After some fruitless experiments I decided to take a shortcut and use the audio support classes in the JigSaw sample application. Copy the entire AudioSupport directory from the JigSaw project. It should contain the following files:

  • Audio_Internal.h
  • AudioFX.h
  • AudioFX.m


You can copy and add the files to your project in Xcode in one fell swoop:

  1. Command-click on the Classes folder.
  2. Select Add > Existing Files
  3. Navigate to the JigSaw sample project and select the AudioSupport directory. Click Add.
  4. Check the “Copy items” checkbox. Click Add.
  5. Now you should have a new folder called AudioSupport under Classes in your project.


You also need to add the AudioToolbox framework

  1. Command-click on the Linked Frameworks folder inside the Frameworks folder in your Xcode project.
  2. Select Add > Existing Frameworks
  3. Navigate to the AudioToolbox.framework folder. Click Add. If you can’t immediately find this file, try this location: /Developer/Platforms/AspenSimulator.platform/Developer/SDKs/AspenSimulator1.2.sdk/System/Library/Frameworks
  4. Click Add again.


Your project should now build without any errors.


Of course you need an audio file to play. The iPhone is capable of playing a large number of audio file formats [link to dev center]. But to start with I recommend that you select a file that is known to work. Let’s go back to the JigSaw sample application again.

  1. Command-click on the Resources folder in your Xcode project.
  2. Select Add > Existing Files
  3. Navigate to the Sounds directory in the JigSaw project. Select one of the sound files. (They have the .caf filename extension.)
  4. Click Add.
  5. Check the “Copy items” checkbox. Click Add.


Now we need some code to play the audio file.


Add this at the top of your file:

#import "AudioFX.h"


Then use this code where you want to play the audio file:

AudioFX *audio = [[AudioFX alloc] initWithPath:@"Completed.caf"];
;


“Completed.caf” is the name of the audio file that you added as a resource to your project.

The above code is simple and to the point, but it has a few problems. One obvious one is that an AudioFX object is allocated but never released. Adding ; just after ; will blow up because the play method is asynchronous: it returns immediately. And releasing the AudioFX object while it’s playing is not very nice.

Another problem is that the code allocates a new AudioFX object each time that audio file is played. If you are going to play the same audio more than once, you should create the AudioFX object once in the init method and use it throughout the life of the app. You can then safely release the object in the dealloc method. This also solves problem number one.


Here’s the final code, used in a UIController:

- (id)init
{
  if (self = [super init]) {
    // Initialize your view controller.
    self.title = @"Play Audio"; 

audio = [[AudioFX alloc] initWithPath:@"Completed.caf"];
  }
  return self;
}

- (void)dealloc
{
  ;
  [super dealloc];
}

- (void)viewDidAppear:(BOOL)animated
{
  ;
}


UPDATE: This code example is outdated. Please see the SoundEffect class used in the BubbleLevel, GLPaint and Metronome projects instead. The interface is very similar, but instead of initWithPath use initWithContentsOfFile.

written by Nick \\ tags:

Mar 07

Apple has published plenty of code samples for the iPhone SDK. They are very instructive, but unfortunately they are not very consistent in style and use of Cocoa. It’s hard to tell what the best practices for iPhone programming really are.

Meanwhile I came across Cocoa Dev Central, an excellent web site full of Cocoa tutorials, articles and information. The site is not focused on the iPhone, but there is plenty of good information for budding iPhone programmers. I highly recommend the Objective-C Style I and II tutorials.

written by Nick \\ tags: ,

Mar 06

Watching the iPhone Software Roadmap event and at the same checking the iPhone Dev Center page. No updates yet.

Steve Jobs just announced that the iPhone Software Development Kit (SDK) will be available today. Yeah! Brace yourself at Apple, your servers are about to come under siege.

The Apple web site is now so slow that it’s practically useless. Finally managed to get through the registration and begin the download.

Checked out the KPCB site to get more info on the iFund. That site is overloaded too. You would think that KPCB would have the connections with the right companies in Silicon Valley to get help with their web site. After all, they own large chunks of all the major Internet companies.

Seven hours later…

The download is finally complete. To my amazement the file is complete and error free. Kudos to the Apple web site infrastructure team. Making sure that the connections that did get through to the site are maintained under such a crushing site load is no small feat.

After a whole day of waiting it took me all of 5 minutes to get the first application compiled, built and running in the iPhone simulator.

This is really cool!

written by Nick \\ tags: ,